
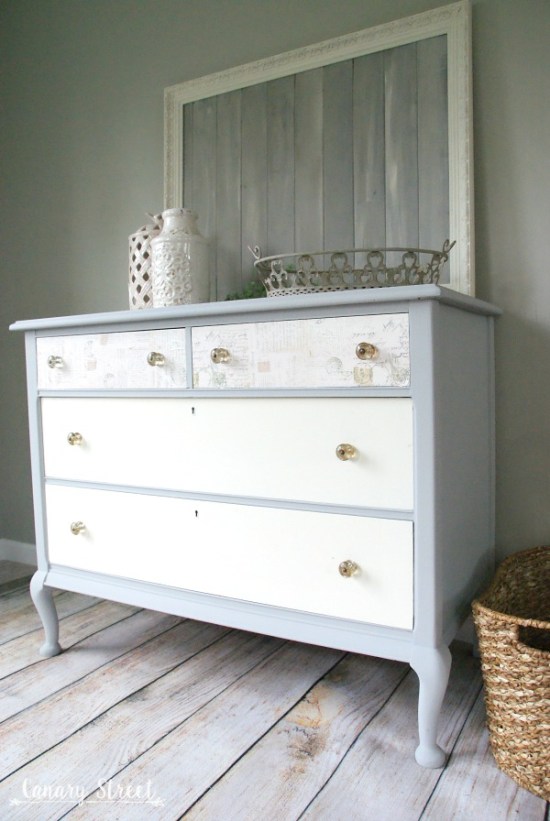
Hello friends! How are you? I have a new furniture makeover to share with you today. This is a dresser that’s been in my stash for at least a year. It was in great shape with just some minor scratches, and I really loved the shape of the legs.
I thought it would be the perfect piece for this month’s Themed Furniture Makeover. If you’re not familiar with our TFM’s, each month we get together with a group of talented furniture painters and we all makeover a piece based on a common theme. This month’s theme is “glitz & glamour”, and as always the theme is open to interpretation by each painter.

This post contains affiliate links. For more information, click here.
In the before photo above, you can see a bit of a mirror propped against the side of the dresser. I decided to separate the pieces because I think I’d like to hang the mirror in my house. Maybe as a bathroom vanity mirror,, I haven’t decided yet.
Anyway, back to the dresser. I’m not much of a “glitz” girl, but to work off the glamour theme I tried to go for a bit of a vintage, feminine look.
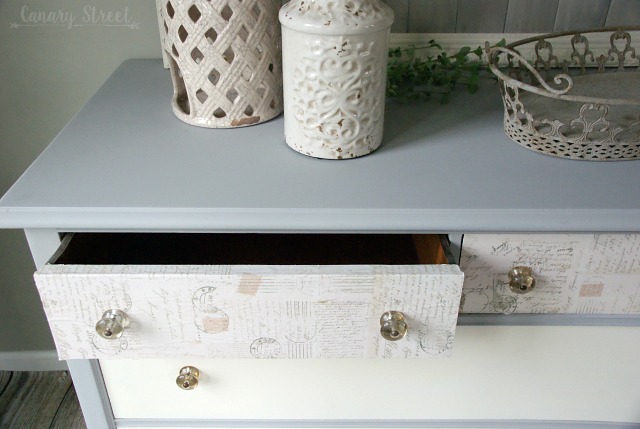
I painted the dresser using Annie Sloan’s “Paris Grey” chalk paint, and the drawers got a couple coats of Annie Sloan’s “Old White” chalk paint. The top drawers are decoupaged with this paper from JoAnn’s. I also used the same paper on this sewing cabinet makeover, and I really like it because it’s thick so it doesn’t tear easily, it comes in a big roll, and it’s inexpensive. I paid $3 for it and have gotten several projects out of one roll.
For those who have never decoupaged furniture, I’ll give you the quick rundown of how I did it. If this is something you’d like to see a full tutorial on in the future let me know in the comments.
To decoupage the drawers, I applied a coat of Mod Podge to the drawer front. It needs to be a thin-to-medium coat. Not too thin and not too thick. This is the Mod Podge I use, and I use a foam brush like this to apply it. Cut the paper slightly larger than the drawer front, then lay it onto the drawer front and smooth it out, taking care to get as many air bubbles and wrinkles out as possible. Once it’s dry, I use a sanding block to sand the edges where I want to remove the excess paper. There are some photos on the sanding process in this post.
I sealed the entire piece with General Finishes High-Performance Top Coat. The new knobs are from Hobby Lobby, and they don’t look nearly as brown in person as they appear in the photos.


Ready to see the rest of the “glitz and glamour” makeovers? Check out them out below, and if you’d like to see the full tutorials just click the photos.

Want to hang out more? We do too! Sign up to get our email updates here.
Or join us on social media: Pinterest, Facebook, Twitter, Instagram, & Google+


I just love your style! It is so soft and stylish. And the colors are so fresh. Love this piece to the moon and back. And brown or not….I love the knobs, too. Susie from The Chelsea Project
Thanks Susie! I wish those knobs didn’t photograph so brown. In person they’re clear with just a hint of a vintage-brown tone. Thank you for stopping by!
I wish I could find more dressers like this one. You can do so much with them. I LOVEEEEEE what you did with yours! Great makeover!
Thanks Lindsay! It’s getting harder and harder to find good dressers!
Amy – as always, another fabulous furniture makeover! Love your color choices and knobs!
Thank you, Vicki & Jenn! You always leave the sweetest comments. I appreciate you!
So pretty and classic now! The glass knobs and decoupaged paper take it over the edge!
Thank you, Lucy!
Love, love, Love, the color combo!
Turned out beautifully!
Hugs,
Karin
Thank you, Karin! 🙂
Amy, another beautiful job. Would love to see a tutorial on the decoupage.
Thank you, Donna! I think a decoupage tutorial would be a good idea too. I’ll work on putting one together. I hope you’re doing well!
Nicely done Amy! I love how you only decoupaged the top two drawers, it gives the dresser and nice visual contrast. Cheers 🙂
Thank you, Annie!
I’d like to see a tutorial on the decoupage also. Your dresser looks great! We’ll done.
Thanks, Marcia! I’ll work on a decoupaging tutorial :).
I love how this dresser turned out….and decoupaging just the top two drawers gives it a one-of-a-kind look. I’ve been meaning to ask you, too…..who did you buy your “wood floor” from? I’ve bought two different floors and hate how they both look. But I love yours.
Thanks, Jamie! The wood floor is a Floor Drop from Backdrop Outlet. It has a rubber back and it super durable like a real rug. It wasn’t cheap, but I destroy paper backdrops and needed something stronger to put furniture on :).
Love how this dresser turned out Amy! The knobs are beautiful and love those top drawers!
Thank you, Kendra!
Love the dresser!
I’d love a decoupage tutorial! There’s always new tricks and techniques to learn!
I totally agree..always new techniques to learn and try! I’ll work on a decoupage tutorial. Thanks for stopping by, Kris!
This is beautiful! Love the color combination, especially with the drawer details!
Thanks, Wendi! 🙂
Absolutely stunning as always, Amy! This dresser has such pretty lines, and I love this paper paired with the Paris Grey and Old White! XO
Thanks so much, Christy!
Wonderful transformation, Amy! Grey and white are my favs!!! The decoupage just adds such depth and glam! Great job.
Kim @huntandhost
Thank you, Kim!
What a beautiful transformation! I love the combination of Paris Grey, Old White and the decoupaged drawer fronts.
Thanks Paula! 🙂
Another gorgeous makeover, Amy! I love how soft and elegant this dresser looks with the paint color combination and the pretty papered drawer fronts. The knobs are the jewelry on this piece. Very nice and pinning to share 🙂
Thank you, Marie!
Love the paper & the final look of the project!
Beautiful! And yes! I’d love to see a full tutorial on decoupaging. I know the basics, but am not very good at it and would love to learn more. Thank you for sharing your amazing work (and knowledge) with us!
As always you’ve taken a piece of furniture that most would have considered drab to absolutely FAB! I love the colors you chose and how you highlighted the drawers too. The whole thing is gorgeous! Hugs, CoCo
Do you often seal with that instead of just a wax?
I very rarely seal with wax anymore. In my opinion it just isn’t a very strong sealer. Wax has to be “refreshed” occasionally, meaning it’s not uncommon to have to re-wax the entire piece once or twice a year to keep it looking nice. I’m not comfortable selling pieces that require that much maintenance and I’m too lazy to keep re-waxing pieces I keep:). I use General Finishes water based top coat a lot and I really like it. Not knocking anyone who chooses to use wax, it’s just not for me. Also, I don’t sell any products so this is a totally unbiased opinion based on my own experience :).