 .
.
A lot of people tend to steer clear of pieces with significant veneer damage. But these pieces are often perfect candidates for paint. We found this dresser in a thrift shop, and despite the surface damage, we knew we could do something fun with it.

There was a significant amount of veneer missing or peeling on the drawers and on both sides of the dresser. The top also had a lot of damage, including these big water marks. The drawers were missing nails and needed some minor repairs as well. 
This post contains affiliate links. For more information, click here.
I started by pulling off all the loose veneer. I had read that you could fill missing veneer with Bondo, so I decided to try it on one of the drawers and use regular wood filler on the rest.
Here’s the spot where I applied the Bondo.

And here it is with the Bondo completely dry and sanded. It was a lot harder to get an even finish than I thought it would be, and it’s still not perfect but it’s the best I could do.

My thoughts on the Bondo after using it once are: 1.) It stinks to high heaven! Seriously, you need to use this stuff outside. 2.) It dries to an extremely hard finish. I should have started sanding before it was 100% dry because it was like concrete once fully dry. 3) It sands to a nice smooth finish that takes paint well. I think with some practice it could be a neat tool to work with, but for the most part I think regular old wood filler is easier to use.
(Update: Several people had questions about the Bondo process, so I put together a step by step tutorial for using Bondo to repair furniture).
The wood filler was easier to sand and a bit more forgiving. And it didn’t stink which was great since it’s like 15 degrees outside and I’m working in the house. This is the wood filler I used, and this is the sander I love.
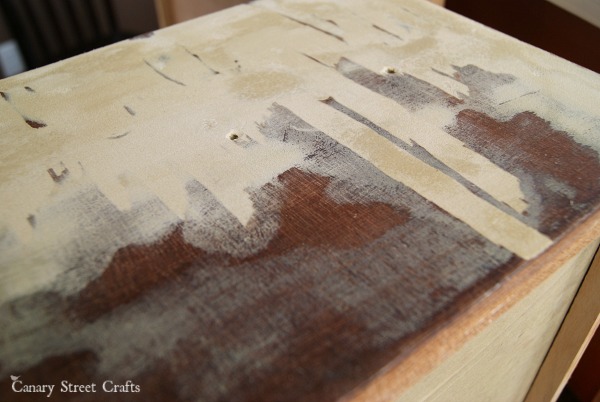

I sanded those nasty water marks and filled some holes on the top too. Once all the damage was sanded I applied the first coat of paint….and came back when it was dry to find the stain bleeding through the paint. Two coats of Zinsser Shellac took care of that problem and I was finally able to get a couple coats of paint on it. The paint I used is Annie Sloan chalk paint in Old White.

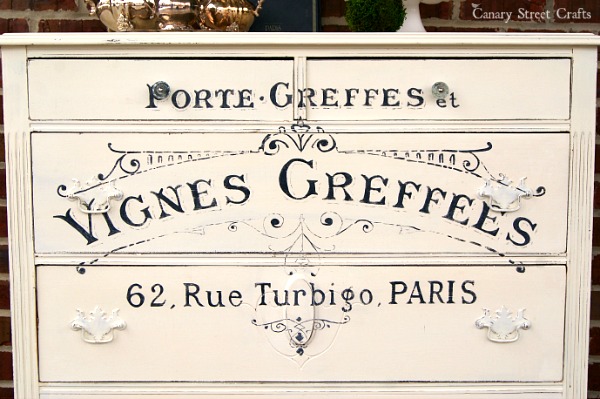
I decided to paint this French Winemaker graphic from The Graphics Fairy on the front of the dresser. I used Annie Sloan “Graphite” for the graphic. You can find our detailed instructions for painting graphics on furniture here.

The insides of the two top drawers were really stained and funky looking, even after a thorough cleaning, so I decided to decoupage them with a French-themed scrapbooking paper.

The bottom drawers were in better shape so I left the insides alone and just added the same paper to the outside of the drawers.

I decided to use the existing hardware on the bottom drawers and just paint them the same as the dresser. They were not original to the dresser and I wish I could’ve seen what the original hardware looked like. I added clear knobs to the top drawers because there was already a lot going on and I wanted to keep it simple.

I distressed it lightly with a fine grit sanding block, then sealed it with clear wax.
This piece was definitely a labor of love, but I feel like I learned a lot and I’m happy with how it turned out. We delivered it to our booth over the weekend and it someone purchased it the same day.

Want to hang out more? We do too! Sign up to get our email updates here.
Or join us on social media: Pinterest, Facebook, Twitter, Instagram, & Google+
Looking for more Chalk Paint projects?


Oh my gosh Amy…this little dresser is adorable, but more importantly your painted graphics are amazing! We appreciate how you saw the diamond in the rough before you brought it home. I know pieces like this can test your experience and patience. But my friend you persevered and it paid off in a big way!! Can’t wait until Wednesdays tutorial!
Thank you, Vicki and Jenn! It was definitely a diamond in the rough and I’m so glad we were able to snag her!
Amy your dresser turned out beautifully! I love finding the beauty underneath. It doesn’t matter if its a dresser or a house that is on it’s last leg. Finding the beauty is something I could spend the rest of my life doing and you did an amazing job here! I can’t wait to see your post on Wednesday!
Cat
I agree, Cat! Thanks so much for stopping by!
This may just be my favorite piece yet! LOVE how it turned out ladies!!!
Thanks so much, Kristi!!
What a great transformation. That piece was in rough shape and you’ve given it so much charm. I’ve been wondering how you do the painted graphics, so I’ll definitely be keeping an eye out for that post. Lovely work. How exciting that it sold the same day you took it to your booth!
Thank you so much, Beverly! We were definitely excited that it sold so quickly. I worked so hard on this one that part of me wanted to keep it but I’m glad someone else loved it enough to buy it :).
Love love love it! What a transformation! The drawer detail is cute too.
Thanks, Lauren!!
LOVE, LOVE, LOVE!!! This is absolutetly stunning!! You did an awesome job! I had to use bondo for a couple of chairs I did, well actually I made my hubby do it! Yes stinky but works awesome for furniture that has damage like this. I would love to know how you did the transfer! 🙂 have a great day!
Thanks so much, Misty!! It did work really well. I still haven’t decided if I like wood filler or Bondo better…I think I need to practice with both of them more before I decide. I’m so glad you stopped by :).
What a fantastic transformation, simply beautiful! Thanks for sharing.
Thank you, Jenny!
This is beautiful! You are so crazy talented! I am a big time furniture re cycler but I don’t think I would have seen the possibility in this one! Beautiful!
You’re too sweet, Emily! If you could’ve seen it in person I know you would have recognized the potential in it. Believe it or not I actually like finding them all sad and beat up looking because I feel like I’m improving them when I paint them. If they’re in too good of shape I feel like it’s a shame to cover all that natural beauty with paint and I just can’t bring myself to do it :).
It is absolutely beautiful Amy!! You did an amazing job! And so brave to try something that was quite damaged! Totally not surprised it sold right away! Have a great week, friend! xo
Thank you, Kendra!!
Amy, I love it! I need some lessons! LOL!
Anytime, Nikki! 🙂
Love this dresser! I can’t wait to see your post on how to put the graphic on. Thank you!
This is absolutely ADORABLE!! LOVE it!
This is totally gorgeous!! Looks like it was worth all that work; you did a beautiful job!
you girls are on fire with these pieces! so so pretty. i love the graphics on the front and i can’t wait to find out how you do it, i just pinned this and will definitely be back on wednesday. sending you hugs, coco
Amy, it’s totally gorgeous! Good for you for not letting all of its flaws scare you away from it. Thanks for the good tips about Bondo and wood filler. I have a piece that needs a big dent/hole filled in, so I may try to find the wood Bondo. I am super excited to see your tutorial on painting the graphics, too! Not surprised you sold this the same day. It’s lovely.
Amy, you did a fantastic job! Wow! Thanks for the information on the Bondo and wood filler and the graphic looks absolutely perfect. Can’t wait to read your info on how you do the graphics. I can see why it sold right away.
You are becoming quite the expert! Your words about bondo really took me back to my college days when I thought I wanted to be like Vin Diesel in Fast and Furious or something. It is awful to work with! And it’s designed to stick to itself better than anything. Your piece is gorgeous and I am excited to see your tutorial.
Thanks, Rachel! I love that it helped you reminisce about your Vin Diesel stage, haha!
I absolutely love this. I would never have thought it could change from that dull dresser into something so amazing. You are very talented!
Thanks for linking up to Marvelous Monday on Smart Party Planning.
You’re too sweet! Thank you, Catherine :).
Gorgeous!!! I just love this piece! You did an awesome job!
Thank you so much, Benita!!
This is amazing!!One of the best transformation I’ve seen.Love it.
Thanks for sharing this with Turn It Up Tuesday!!
LOVE LOVE LOVE!!!
What a transformation! Thanks so much for linking up at Motivational Monday! Hope you will link up again tomorrow!
Hello cute ladies! I’m just stopping by to let you know that Kimberly has chosen your French dresser as her favorite and we will be featuring it at our party tonight at 7. Woo Hoo! Thanks for being a part of our party! Lou Lou Girls
This is such a great makeover, taking an ugly duckling and turning it into a beautiful swan. I really like the graphic that you chose for the dresser. Love IT.
Thank you so much, Tracy!
Now that’s a rescue! Just beautiful! I didn’t even realize there was detail on the front until you painted it white (ie, the picture before the graphic!) Your hard work paid off!
Thank you, Cynthia! The pretty detail was lost in all that broken veneer, wasn’t it? I appreciate your comment!
That is beautiful!! What a great way to make something old, new!! 🙂
Thank you, Jamie!
Très magnifique! I just love the vintage French look. I wish we lived closer so I could buy your pieces!
Thanks, girl! xoxo
It’s gorgeous! I probably would have passed it by because of the repairs needed but you did a wonderful job of restoring it. Just love the graphic….obviously you are experienced at that…I am scared to death to try it! Found you on Share Your Cup Thursday
Another fabulous project. You are so very talented! Thanks for sharing with SYC. I’m sure it’s not intentional, but not seeing a link back to the party.
hugs,
Jann
Amy, this dresser is AMAZING! I can’t believe how much work you did! I am always scared away from anything missing veneers. Love what you did with the drawers:). Congrats on selling it so quick!!! Thanks so much for sharing it with Dream. Create. Inspire. Link!
These are great tips on the veneer repair. The dresser turned out Beautiful!! I love it!
Thanks so much, April!
Hi Amy. The dresser is simply beautiful! What an awesome makeover! Read your tutorial on the graphics & I’m inspired to try it myself. Thanks for sharing.
Thank you so much, Melva! I’m so glad you’re inspired. I wish you the best of luck with your projects and if you have any questions don’t hesitate to send me an email :).
Amy, I don’t believe I’ve seen this makeover of yours before – I love it, especially with the added paper inside the drawers! It all came together beautifully. <3
Thanks so much, Jen! And thanks for including it in your image transfer roundup.
Hello,
Great work on all your pieces! I share your concern that wax should not be considered adequate protection for heavily used pieces. That said, the look of wax is fabulous, especially in highlighting wood details. Have you ever tried using GF clear coat over a piece that has been waxed? I’m thinking it might work if the wax is fully cured ( a month or more). Please let me know if you have ever tried this and what your experience was like.
Thank you!
Hi Cathy! It might be possible that GF top coat could work ok over fully cured wax, but I’ve never tried it and GF actually recommends against doing it. In a response directly from GF, they say none of their products adhere properly to a waxed surface, even when cured.
On the flip side, if you really like the look of wax but want a stronger finish over your painted surface, you can wax over a top coat like GF. I’ve never done it, and I think you’ll probably still get fingerprints and marks in the wax over time, BUT it can be done successfully if you really wanted to. 🙂
Hi Amy,
Thanks for the speedy response. That’s exactly what I thought they would say. I’ve thought about this a lot and I think I want to stay away from wax because of the potential stickiness, fingerprints and less than optimal protection on frequently used furniture.I’m thinking of experimenting with a painted surface to which I wipe on a highly diluted darker paint color. I’m hoping for a look similar to what you get with a gel stain. The look I’m striving for is highlights of the various nooks and crannies but with the underlying color still showing through. I’ll let you know how it turns out. thoughts??
Hi Cathy! Yes, I use this technique a lot and LOVE it! I did something similar on this piece http://canarystreetcrafts.com/how-to-age-furniture-with-paint/ and just recently used the same technique with a lighter paint color here http://canarystreetcrafts.com/gray-white-stenciled-table/. It’s a really fun way to add detail to your piece. If you experiment with different paint colors I’d love to know how it turns out!